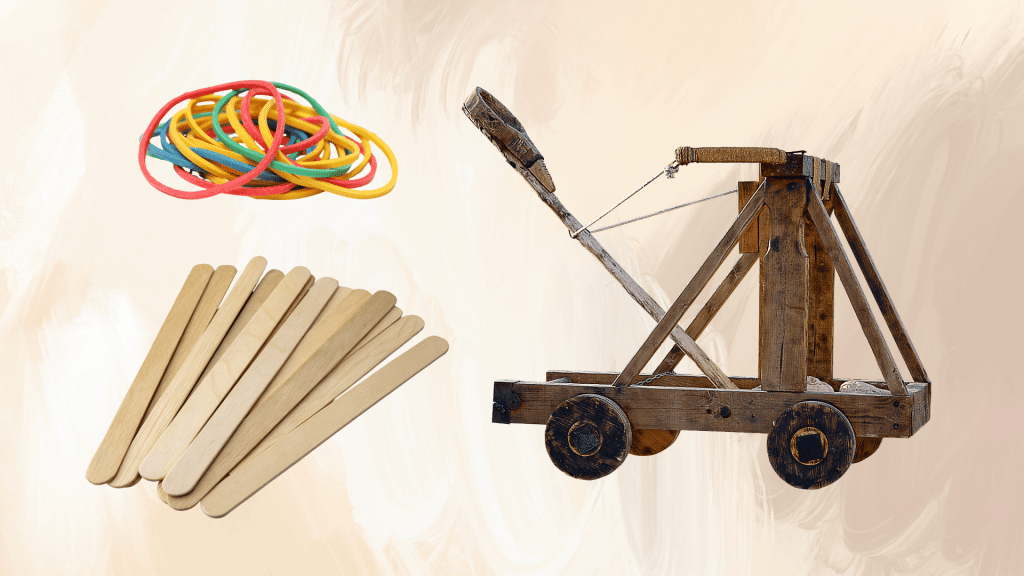
I’ve always found that a popsicle stick catapult is the kind of project that feels simple at first, but keeps surprising you the more you try it.
You only need a handful of supplies, yet the result is a real working launcher that shows how energy and motion come together.
I like how it turns into both a fun activity and a chance to experiment, because every small change can lead to different results. You’ll enjoy seeing how far your catapult can throw and what tweaks make it even better.
To get started, let’s go over how it works.
How Does a Popsicle Stick Catapult Work?
A popsicle stick DIY catapult looks simple, but it follows the same physics as big machines. At its core, it’s all about force and energy.
When you press the arm down, you’re storing potential energy in the rubber bands and sticks. Once you let go, that energy turns into kinetic energy, which launches the object forward.
The setup works like a lever. The spoon or stick arm is the lever, and the stacked sticks at the base act as the fulcrum. By pushing one end down, the other end flips up and sends your object flying.
Small changes, like how tightly you wrap the bands or where the fulcrum sits, can really affect how far your catapult throws. You’ll see the same thing when you experiment with yours.
How to Build a Catapult: Step-by-Step Instructions
Let’s start with one solid build. This version is easy, sturdy, and works great for testing.
Tools and Materials You’ll Need
Before you build your catapult, gather the supplies. Most of these are inexpensive and easy to find at craft stores, dollar stores, or online.
- 12 Jumbo Craft Sticks: Ten for the fulcrum (base) and two for the lever.
- 3–4 Rubber Bands: Used to hold the sticks together and create tension.
- Launch Cup: A bottle cap, small plastic cup, or disposable spoon all work well.
- Glue: A hot glue gun gives the strongest hold, but school glue can also be used.
- Pom-Poms: Soft, safe projectiles that are perfect for launching indoors or outdoors.
Dollar stores usually have all these items in bulk, and craft aisles at big-box stores carry them year-round. Buying a mixed pack of craft sticks and rubber bands is also an affordable way to stock up for future projects.
1. Basic Catapult (Classic Stack + Lever Design)
Let’s start with the simplest build. This one gives you a sturdy catapult that works well right away and helps you learn the basics before moving on to other designs.
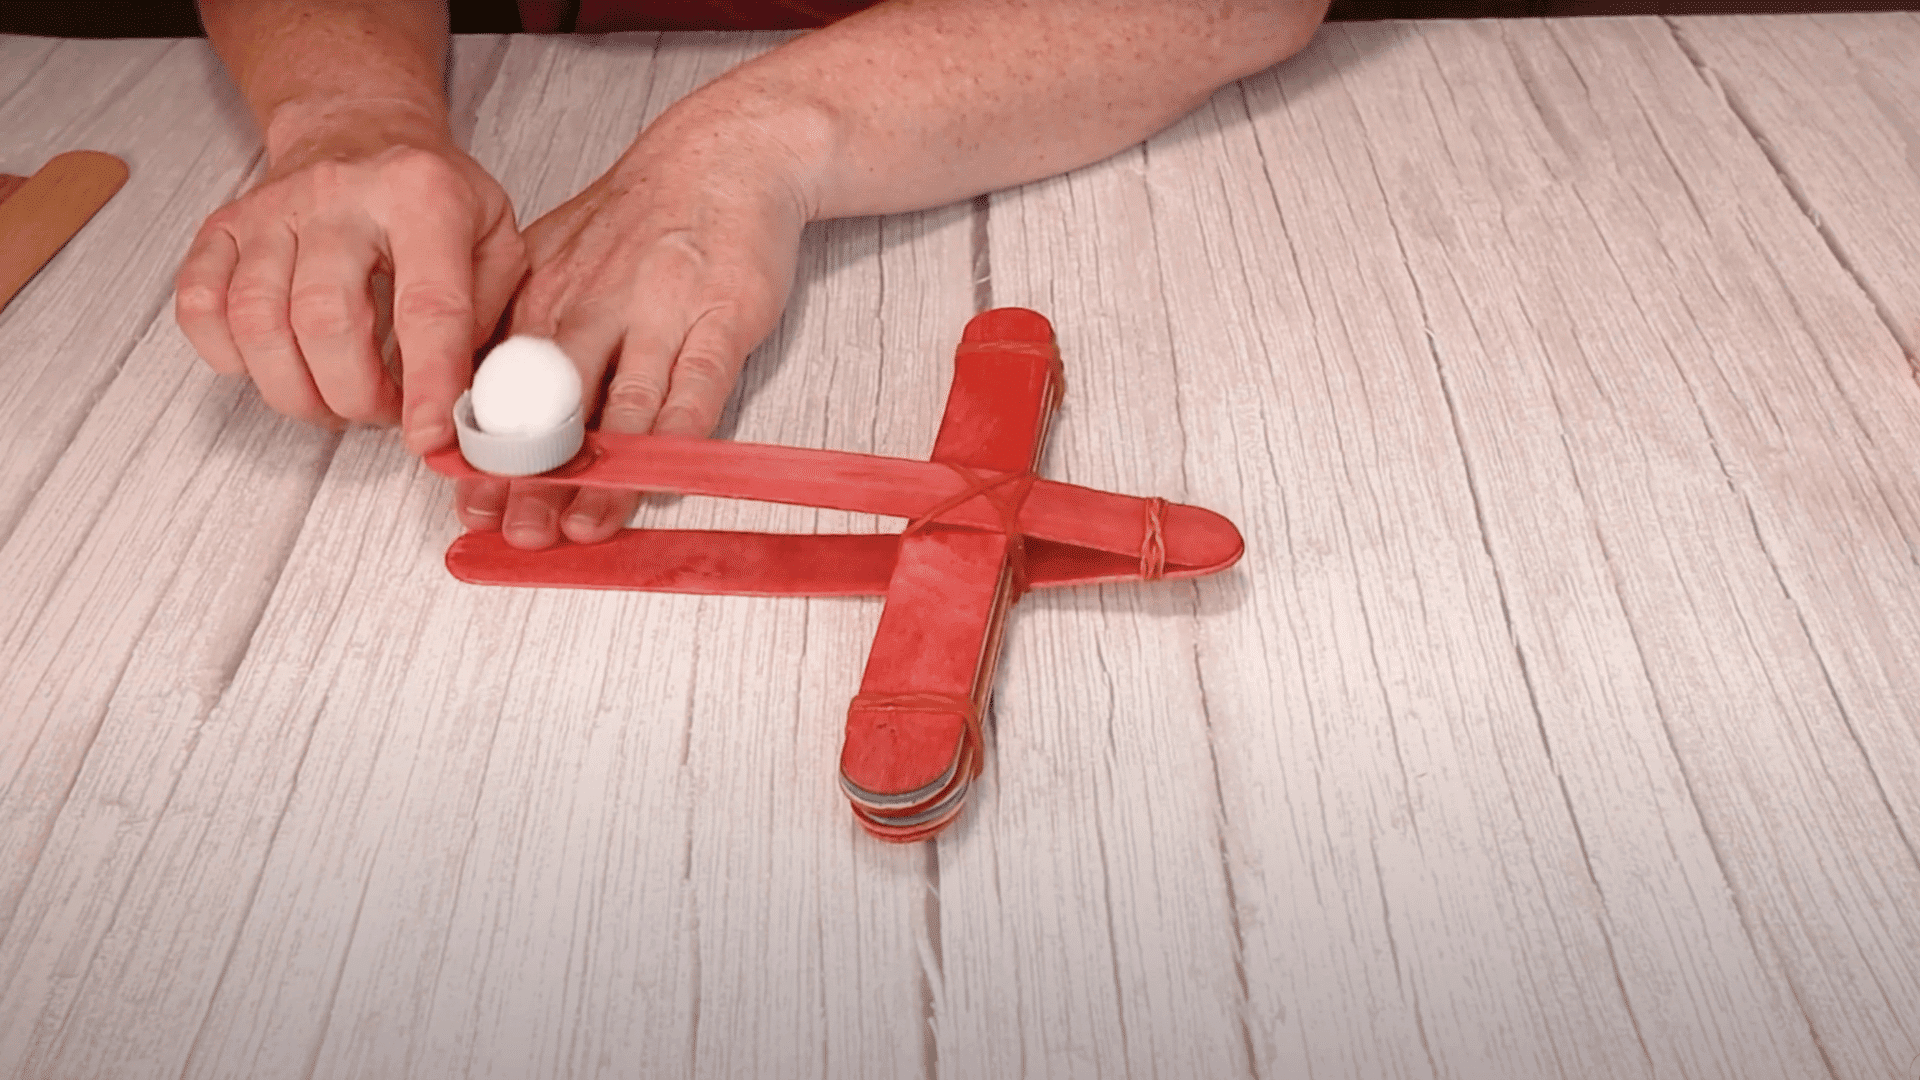
Step 1: Make the Launch Cup
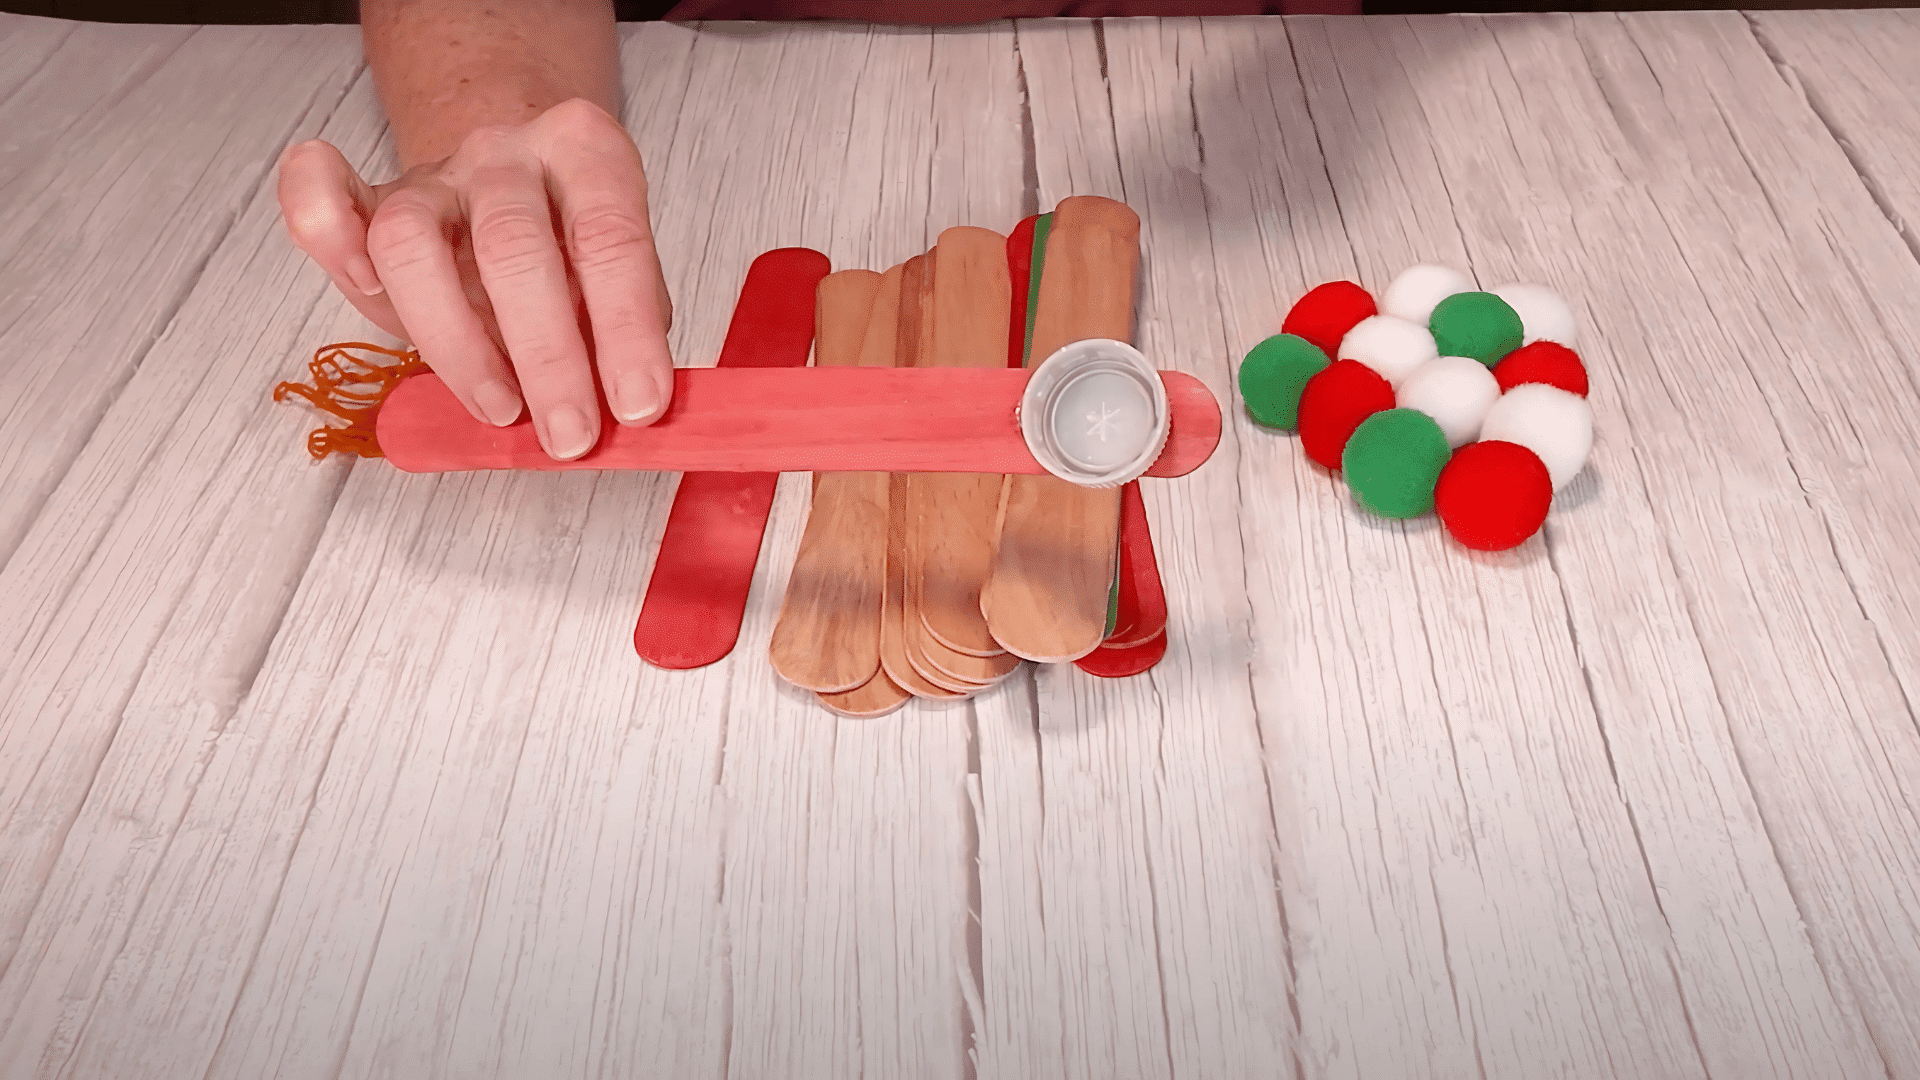
Glue a bottle cap, small cup, or spoon bowl to the end of one stick. This cup will hold your pom poms. Hot glue works best for strength, but let it cool before handling. Position the cap so it sits flat and centered.
Step 2: Build the Fulcrum (Base)
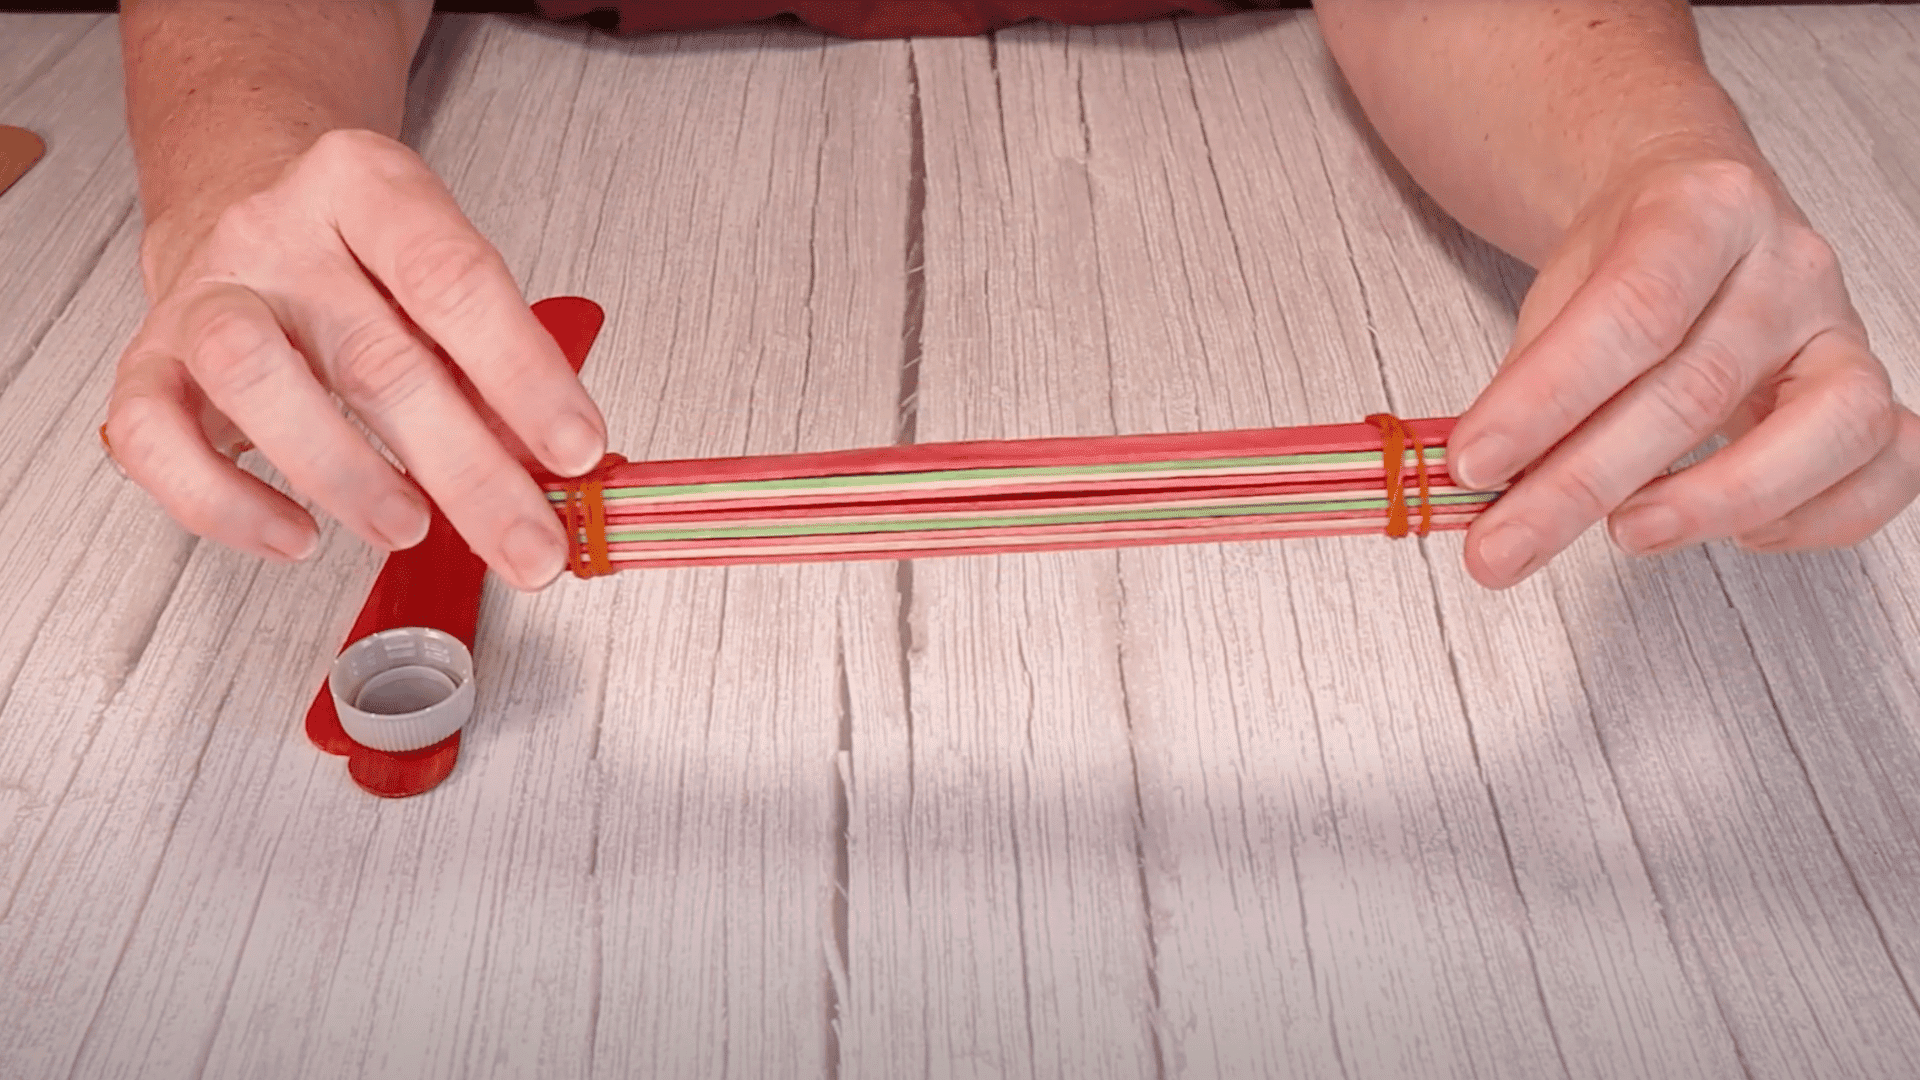
Stack 10 jumbo craft sticks into a neat pile. Wrap rubber bands tightly around both ends. The stack acts as the fulcrum, the pivot point for the lever. A taller stack changes how far your projectile travels.
Step 3: Prepare the Lever

Place the cup stick on top of a plain stick. Band the ends together on the side opposite the cup. Keep it tight but leave a small gap near the cup. This creates a two-stick lever arm.
Step 4: Attach Lever to Fulcrum
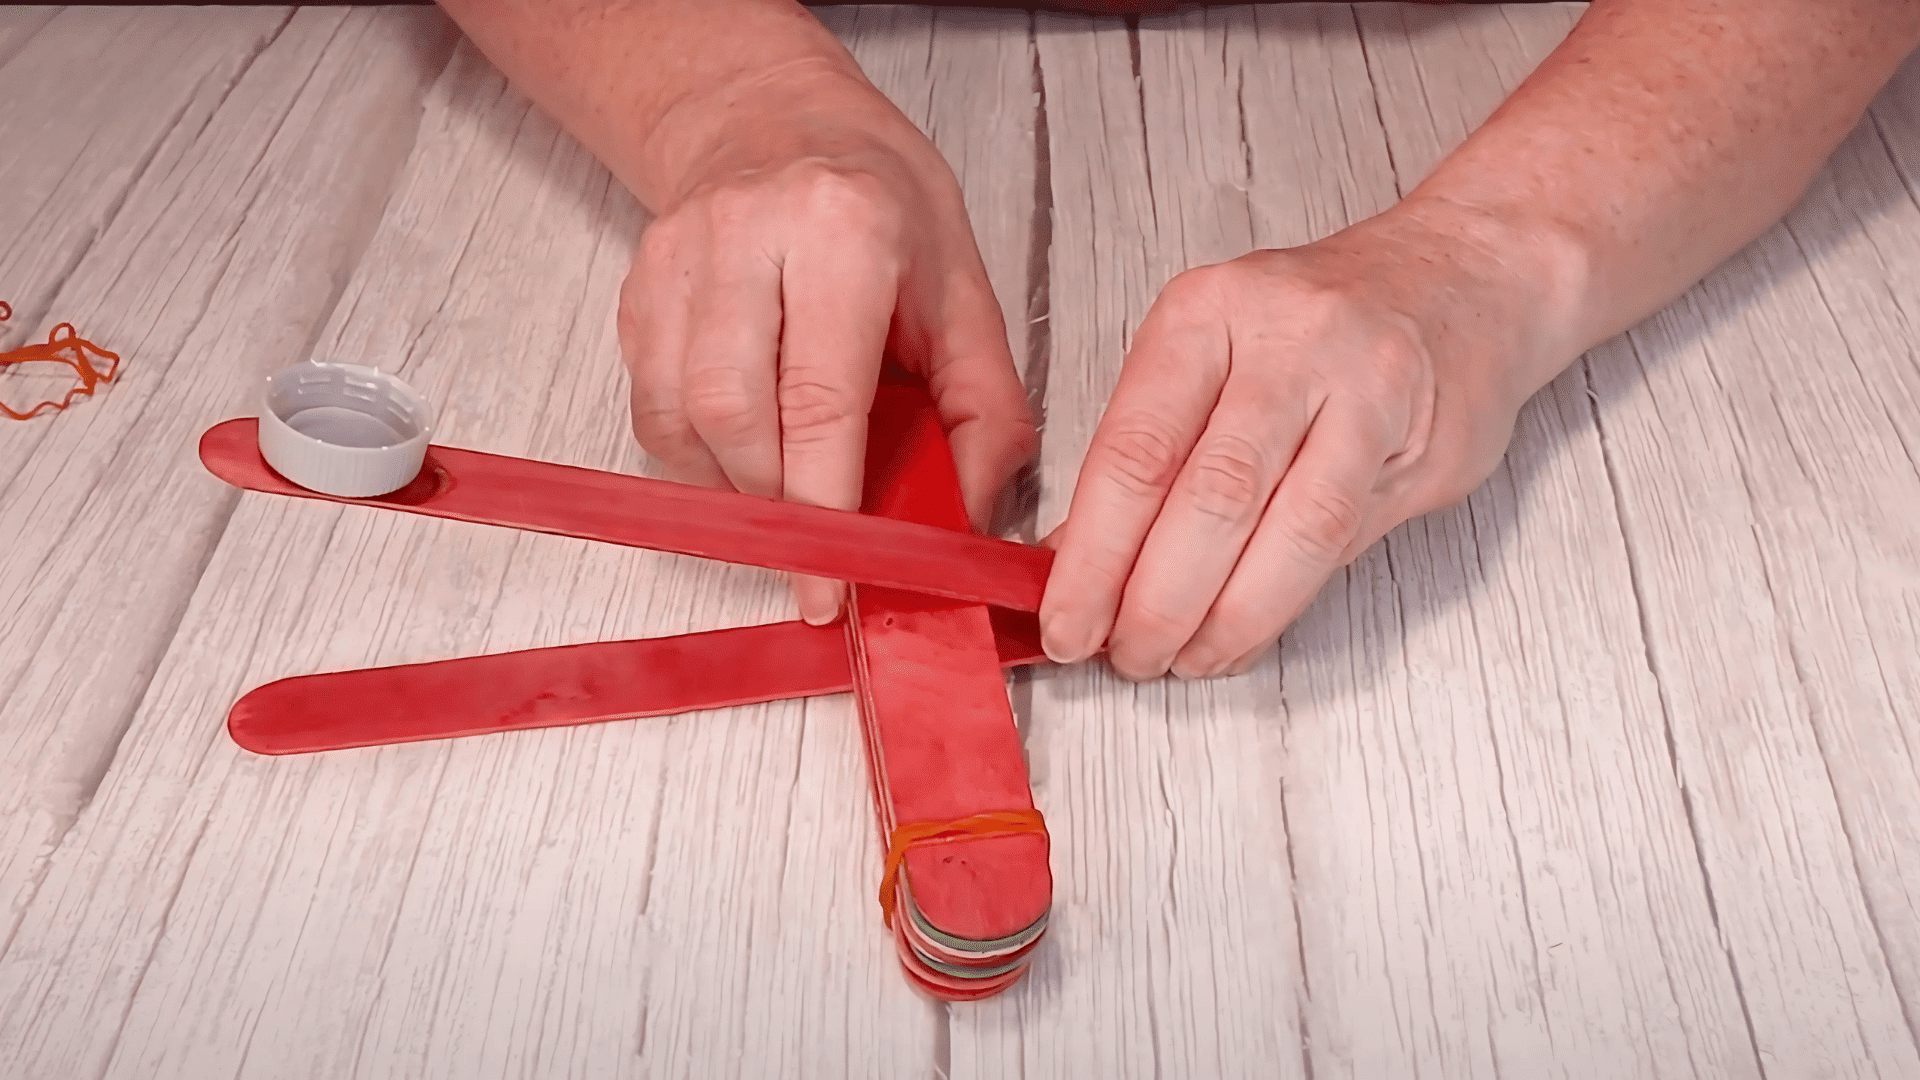
Slide the plain stick of your lever into the stack between the top and the second stick. Push it in about a finger’s width. This makes the pivot point, so the lever can move up and down.
Step 5: Secure the Pivot
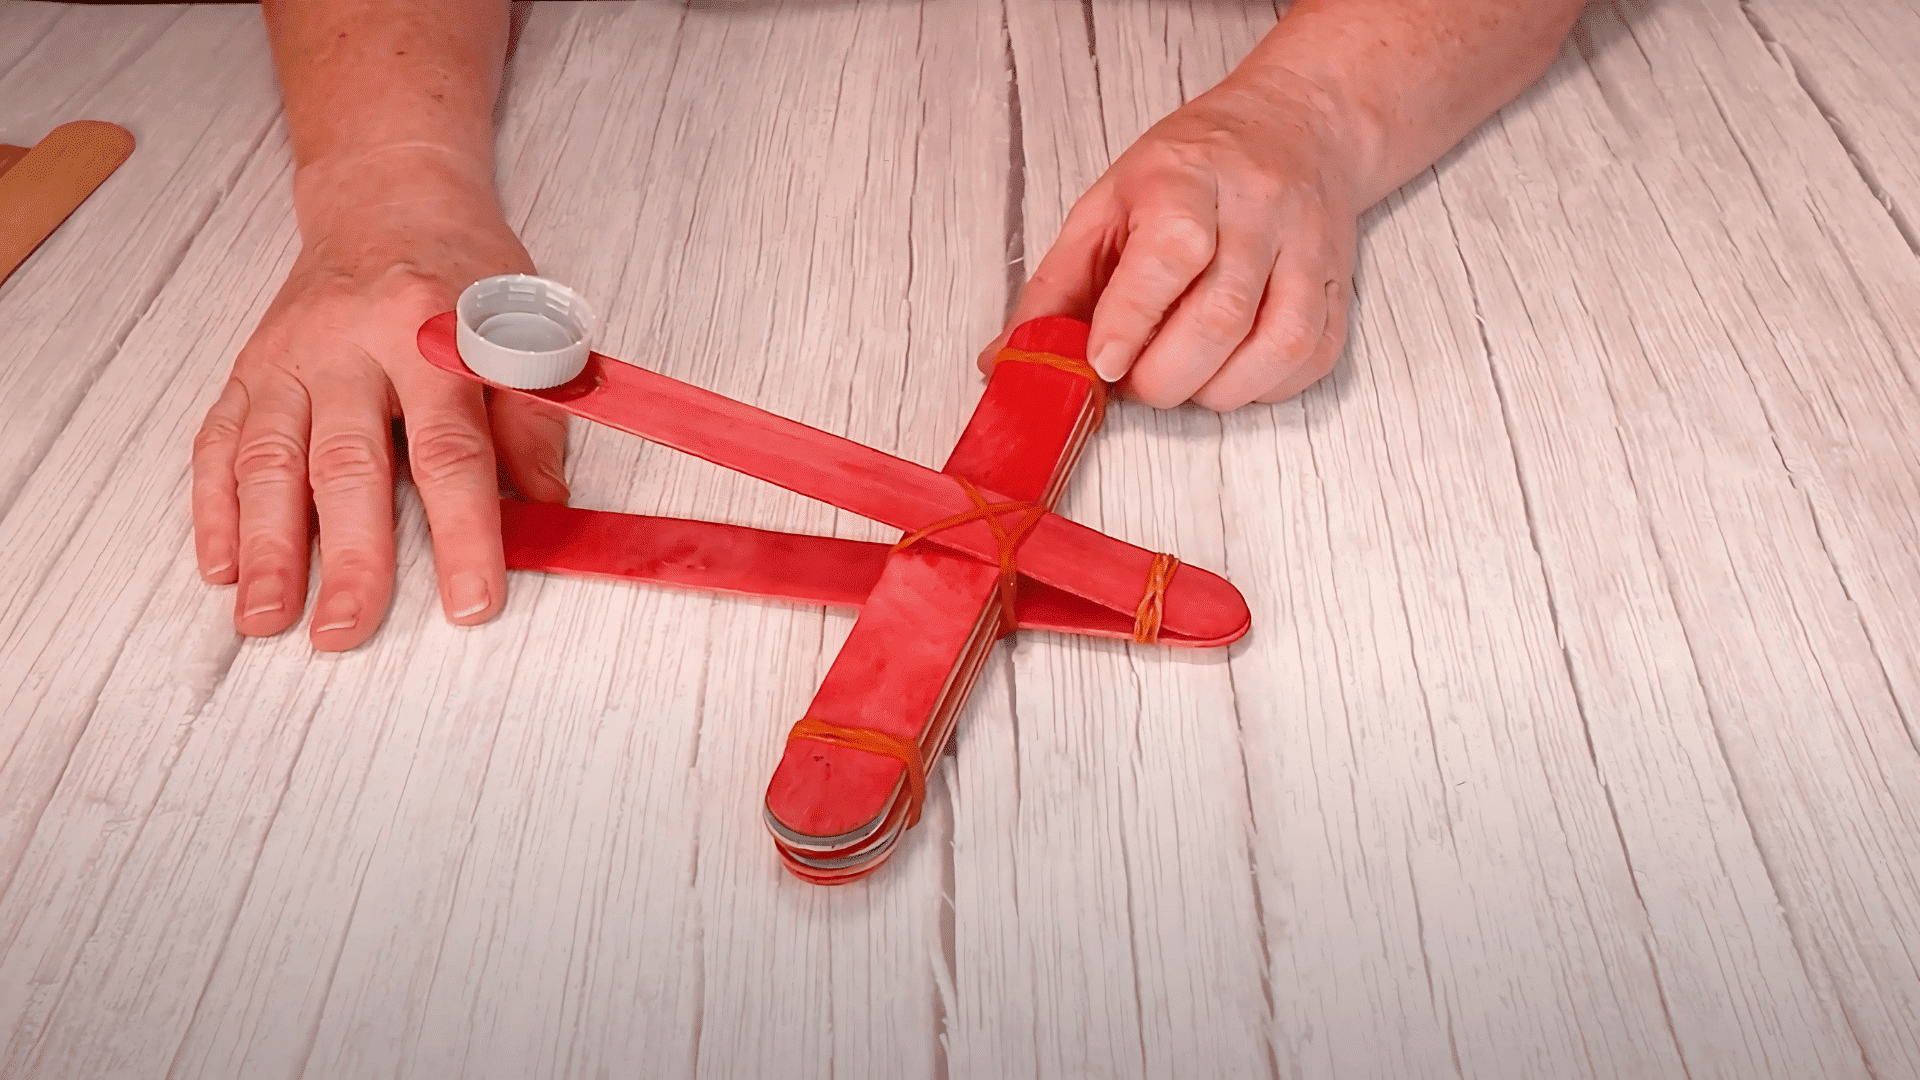
Wrap another band around the spot where the lever meets the stack. Make sure the arm still moves freely. If it wobbles, adjust the bands until it feels firm.
Step 6: Test and Launch
Place a pom pom in the cup. Hold the base with one hand. Press the cup stick down with the other hand, then release. Try pressing with different amounts of force to see how far it goes.
Adjustments to Try
- Change the number of sticks in the base (8, 10, 12).
- Slide the lever in more or less to test launch angles.
- Switch how hard you press to compare distances.
DIY Popsicle Stick Catapult: Video Tutorial
For a detailed walkthrough, check out the video tutorial below. It shows exactly how to build and use the catapult.
2. Quick Variations
Once you’ve mastered the basic version, try these simple tweaks:
Spoon Catapult: Stack 5–6 sticks, band both ends, then attach a spoon on top with a rubber band. Fast and glue-free.
Triangle Base Catapult: Glue three sticks into a triangle, add a crossbar, and attach the lever at the corner. This version is extra stable.
Advanced Builds: Double the base, add crossbars, or test taller fulcrums. These changes make the catapult stronger and more powerful.
Tips to Improve Your Catapult
Once you’ve built your catapult, you might want it to launch farther or hit a target more accurately. Small tweaks can make a big difference. Here are some simple ways to improve your design:
| Goal | What to Try | Why It Works |
|---|---|---|
| Increase Range | Wrap rubber bands tighter; use a sturdier spoon or stick; add more sticks to the base | Tighter bands store more energy, stronger arms release it better, and a stable base gives a cleaner launch |
| Adjust Accuracy | Place on a flat surface; keep the launch arm centered; use lightweight projectiles | Stability and balance prevent sideways launches, while light objects fly straighter and stay consistent |
| Make It Sturdier | Glue or tape joints; add extra sticks to reinforce the base; replace old rubber bands | Stronger construction keeps parts from slipping, reduces wobble, and fresh bands restore tension |
Try experimenting with one change at a time. That way, you’ll notice exactly how each adjustment affects the launch.
Troubleshooting Common Problems
Even well-built popsicle stick catapults can act up. Here are the most common problems and simple ways to fix them.
- Too Weak: The launch arm doesn’t have enough power. Wrap the rubber bands tighter, swap in fresh ones, or use a stronger stick or spoon for the arm.
- Unstable Base: The catapult tips or leans during use. Add more sticks for support, secure joints with tape or glue, and test it on a flat surface.
- Projectile Slips Off: The object falls before launching. A spoon or small cup at the end of the arm helps hold items in place.
- Bands Keep Snapping: Rubber bands can break if they’re overstretched or old. Replace them regularly and avoid pulling the arm back too far.
With a few quick adjustments, you can solve most problems and keep your catapult working smoothly.
STEM Learning Ideas
A popsicle stick catapult isn’t just fun; it’s also a great way to bring science into play. Here are some simple ways to turn it into a learning tool.
Classroom Experiments
You can use the catapult to test different setups and record results. Try these simple experiments:
- Projectile Types: Launch marshmallows, pom-poms, or paper balls and compare how far each one travels.
- Angle of Release: Change the arm’s starting angle to see how it affects distance.
- Number of Bands: Add or remove rubber bands to measure the effect on power and range.
- Base Design: Build a wider or taller base and check if stability changes accuracy.
Students can collect data, graph results, and talk about why each test gave a different outcome.
Connecting to Newton’s Laws
Catapults are a clear example of Newton’s Laws of Motion.
When you push down the arm, you’re storing energy that shows Newton’s First Law: an object stays at rest until acted on by force.
When released, the projectile flies forward, showing the Second Law: force equals mass times acceleration.
Finally, the projectile eventually lands, showing the Third Law: for every action, there’s an equal and opposite reaction.
Science Fair Project Ideas
With a little creativity, a catapult can become a full science fair project. Students can test how different materials for the launch arm affect distance, compare the impact of rubber band thickness, or design new bases for better accuracy. They can also create charts, graphs, or models to explain their findings.
Using a catapult this way makes physics hands-on and helps students see how simple machines work in real life.
Safety Tips
Before you start launching, it’s smart to think about safety. Catapults are fun, but a few simple rules keep the activity safe for everyone.
- Age Recommendations: Popsicle stick catapults are best for kids ages 6 and up, with adult supervision for younger children.
- Safe Launch Materials: Use soft, light objects like marshmallows, pom-poms, or paper balls. Avoid hard or sharp items that could cause injury or damage.
- Indoor vs. Outdoor Play: If you’re indoors, keep breakables out of the way and set a clear boundary for play. Outdoors, make sure kids stay behind the launcher and have enough space to fire safely.
These small steps help make the project safe, controlled, and still full of fun.
Fun Challenges & Games
Once your catapult is ready, you can turn it into a game. These simple challenges keep kids entertained while sneaking in a little learning, too:
| Game | How It Works | Why It’s Fun |
|---|---|---|
| Mini Competitions | Line up catapults and see whose projectile goes the farthest. Measure the distance to pick a winner. | Adds excitement and encourages kids to improve their designs. |
| Target Practice | Aim for cups, bowls, or chalk circles. Give points based on accuracy. | Builds focus and makes each launch more challenging. |
| Themed Activities | Launch candy at Halloween, marshmallows for camp games, or paper balls in class. | Keeps the activity fresh with seasonal or creative twists. |
Games like these turn a simple catapult into hours of fun and learning.
Wrapping Up
Building a popsicle stick catapult is a simple project that delivers much more than a quick burst of fun. It gives you a chance to test ideas, adjust designs, and see science in action right in front of you.
I’ve noticed that the real value comes from experimenting, changing one detail at a time, and watching how the results shift.
You’ll learn how small adjustments can lead to big differences in power, distance, and accuracy. It’s a hands-on way to learn while having fun, whether at home or in a classroom.
If you’re ready for more creative projects, check out my other DIY and STEM activity blogs for fresh ideas.