Ever wanted to trap a flower in time, create a glittery galaxy in your palm, or make jewelry that looks like it came from a fancy boutique? Well, grab your gloves because resin crafting is about to become your new obsession!
It’s goopy, it’s glossy, and honestly, it’s a little magical. The best part? You don’t need to be an artist to get started, and if you enjoy creative hobbies, diy candle making is another fun craft you can learn alongside it.
All you need is a little curiosity, some basic supplies, and the willingness to get your hands a tiny bit messy. Let’s learn and create something absolutely stunning together!
What Are Resin Crafts?
Resin crafts are creative projects made using liquid resin, most commonly epoxy resin, that hardens into a solid, glossy finish when mixed with a hardener.
This versatile material can be poured into molds, layered with decorative elements, or used to coat surfaces, allowing you to create everything from jewelry and coasters to art pieces and home décor.
What makes resin crafting especially appealing is its ability to preserve objects like flowers or photos while producing a smooth, glass-like look that feels both durable and professional.
If you enjoy hands-on creativity, learning about simple diy craft can open up even more fun and easy projects to try at home.
Types of Resin You Should Know Before Starting
Before choosing your first project, it’s important to understand the different types of resin available and how each one is best used.
| Type of Resin | Best For | Key Features | Cure Time |
|---|---|---|---|
| Epoxy Resin | Coasters, art, molds | Versatile, glossy finish, easy to use | 24–72 hours |
| UV Resin | Jewelry, small crafts | Quick curing, no mixing required | Minutes |
| Casting Resin | Deep molds | Thin consistency, fewer bubbles | 48–72+ hours |
| Doming Resin | Surface coating | Thick, self-leveling, high-gloss | 24–48 hours |
How to Use Resin: Step-By-Step Basics
Mastering the basic steps will help you avoid common mistakes and achieve a smooth, professional-looking finish.
Essential Supplies
To get started with resin crafting, you only need a few basic tools and materials that help ensure smooth, safe, and successful results.
- Epoxy resin kit (resin + hardener)
- Silicone molds
- Mixing cups and stir sticks
- Disposable gloves
- Measuring tools (cups or digital scale)
- Pigments, dyes, or mica powders
- Heat gun or torch (for removing bubbles)
- Protective work surface (silicone mat or plastic sheet)
- Toothpicks or tweezers (for detailing)
- Mask (for safety and ventilation)
Step-By-Step Tutorial
Follow these simple step-by-step basics to ensure your resin projects turn out smooth, clear, and professionally finished every time.
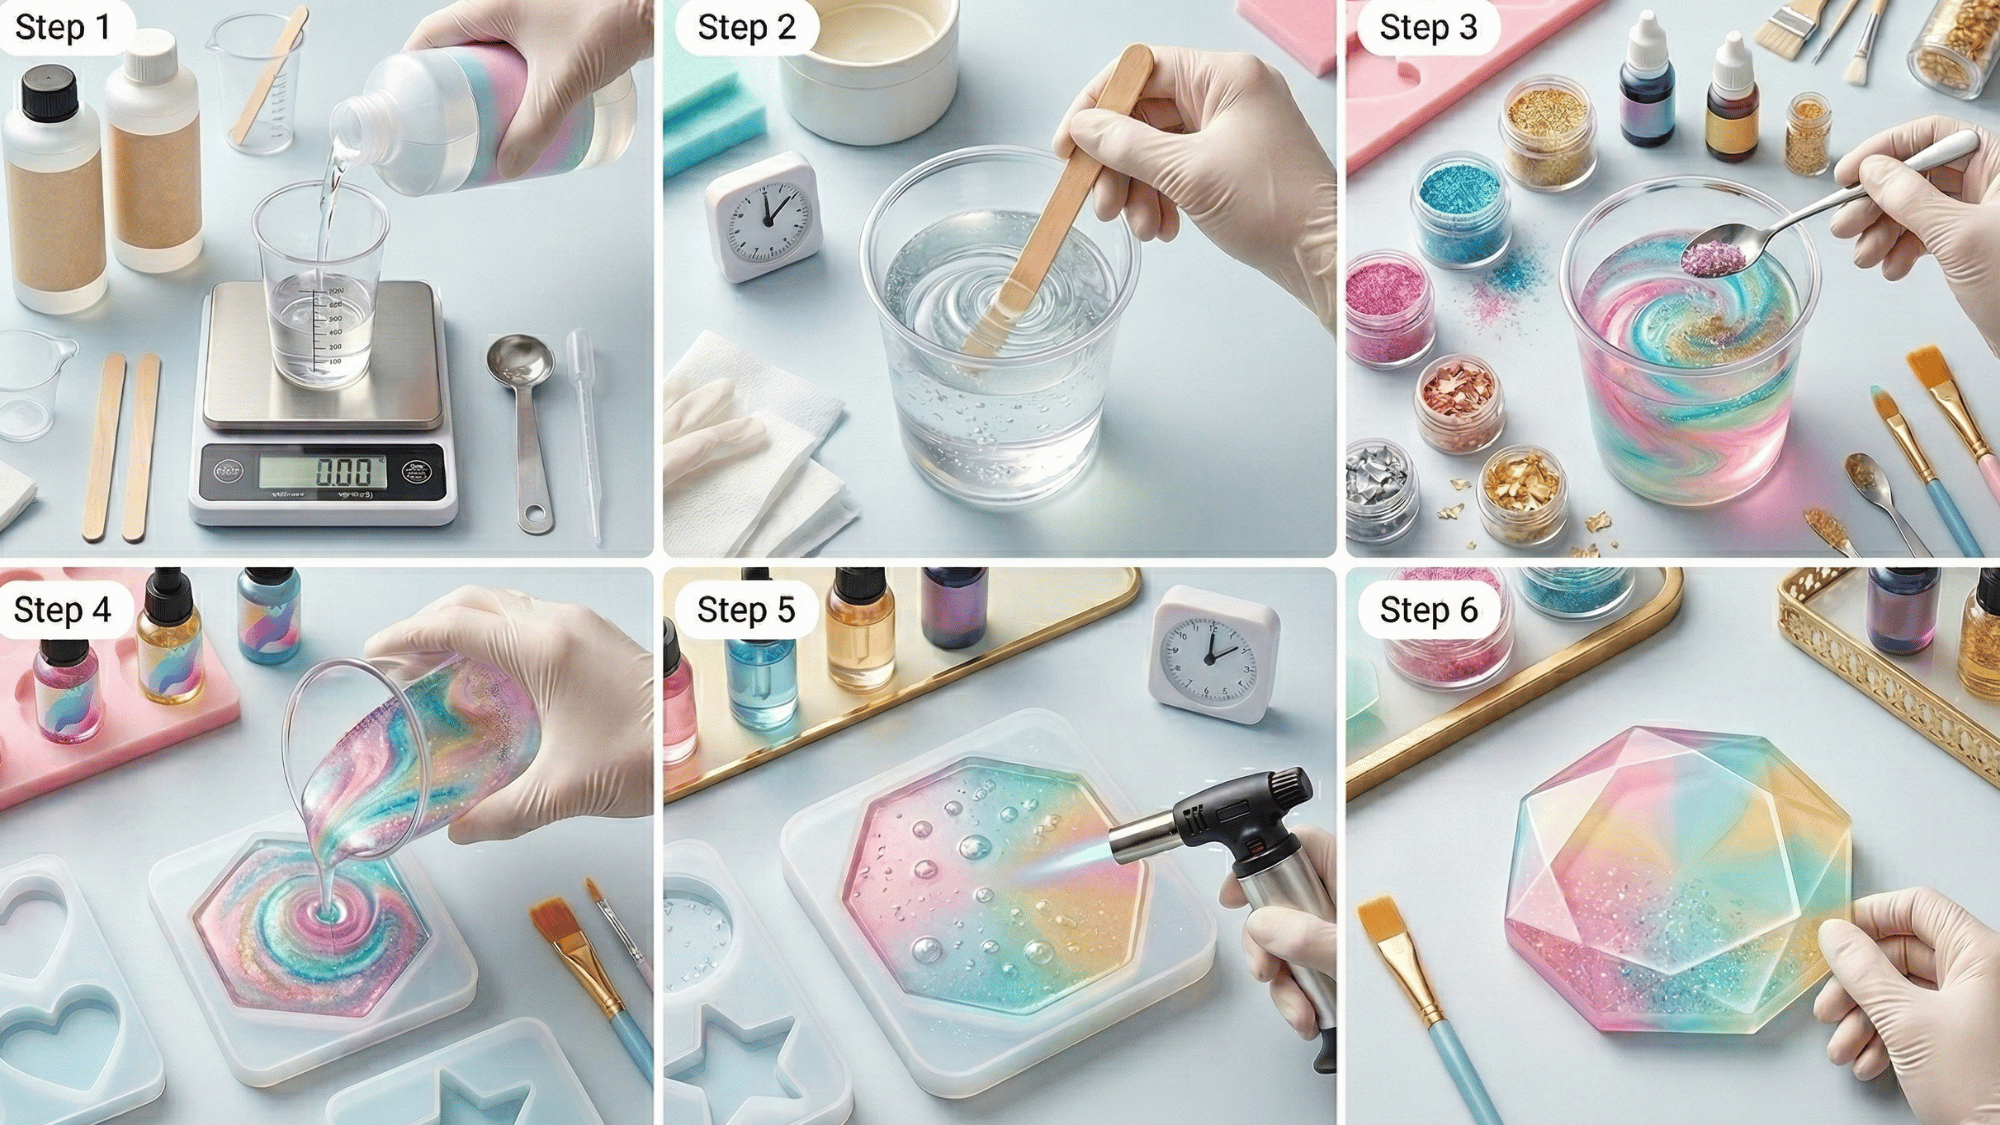
Step 1: Measure Correctly
Accurate measuring is the foundation of successful resin crafting. Most epoxy resins require a specific ratio, commonly 1:1 or 2:1, and even slight deviations can affect curing.
Always use proper measuring cups or a digital scale for precision. Avoid guessing, as incorrect ratios can result in sticky or soft resin that never fully hardens.
Step 2: Mix Thoroughly
Once measured, mix the resin and hardener slowly and consistently for about 3–5 minutes. Scrape the sides and bottom of the container to ensure everything is evenly combined.
Mixing too quickly can introduce air bubbles, which affect the final finish. A well-mixed resin should look clear and uniform without streaks.
Step 3: Add Color or Decorations
After mixing, you can customize your resin by adding pigments, dyes, glitter, or small decorative items.
Start with a small amount of color and gradually build up to your desired shade. Make sure any inclusions (like flowers or paper) are dry and clean. Overloading additives can interfere with curing, so keep it balanced.
Step 4: Pour into Mold
Pour the resin slowly into your mold or onto your surface to prevent bubbles and spills. Aim for a steady, controlled pour rather than dumping it all at once. If you’re working with layers, allow each layer to partially cure before adding the next. Ensure your surface is level so the resin settles evenly.
Step 5: Remove Bubbles
Air bubbles are common, especially after mixing and pouring. Use a heat gun or small torch briefly over the surface to pop them. Keep the heat source moving to avoid overheating or burning the resin.
You can also use a toothpick to remove stubborn bubbles in detailed areas.
Step 6: Let It Cure
After pouring, leave your resin project undisturbed in a dust-free area. Curing usually takes between 24 to 72 hours, depending on the resin type and environment.
Avoid touching or moving it during this time, as it can ruin the finish. Proper curing ensures a hard, glossy, and durable result.
What Can You Put Inside Resin?
One of the most exciting aspects of resin crafting is the ability to embed a wide variety of decorative elements to create unique, personalized pieces.
You can add items like dried flowers, glitter, gold flakes, beads, shells, or even small photographs to give your projects depth and character.
It’s important to ensure that anything you place inside resin is completely dry and clean, as moisture can cause cloudiness or bubbles. With the right combinations, you can create stunning designs that are both artistic and meaningful.
Creative Resin Craft Ideas for Practice and Skill Building
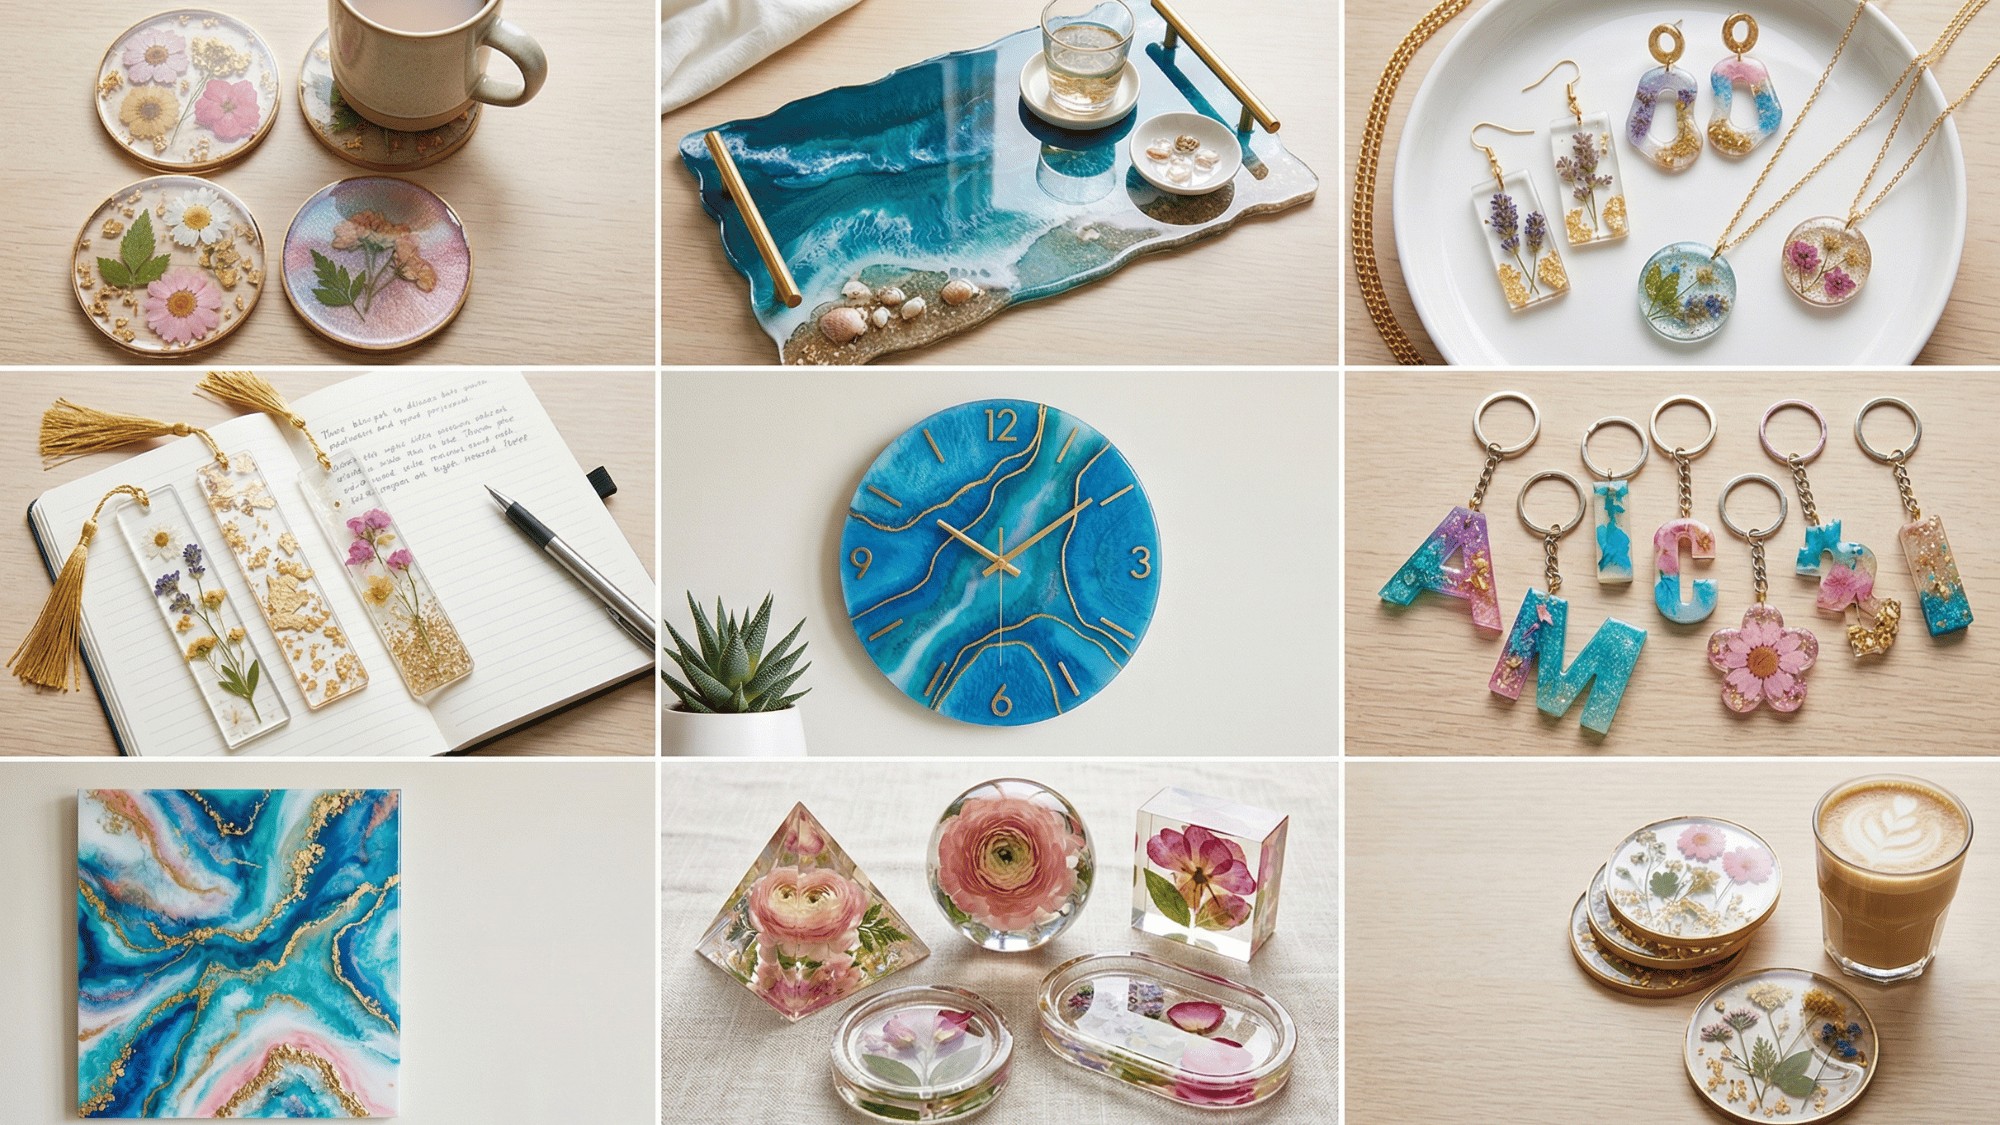
Once you’ve mastered the basics, trying more creative projects can help you improve your skills and make new design possibilities with resin.
- Resin Serving Tray – Create a stylish tray with marble or ocean wave effects for home décor.
- Abstract Resin Wall Art – Experiment with colors and patterns to make modern art pieces.
- Resin Clocks – Design functional wall clocks with embedded designs or pigments.
- River Tables (Mini Version) – Combine wood and resin to mimic a flowing river effect.
- Resin Photo Frames – Preserve memories by embedding photos in clear resin frames.
- Jewelry Organizer Dish – Craft small trays to hold rings, earrings, and accessories.
- Resin Bookends – Make decorative and sturdy bookends with unique inclusions.
- Geode-Inspired Art – Use crystals and metallic pigments to mimic natural geodes.
- LED Resin Lamps – Create glowing pieces by combining resin with LED lights.
- Layered Resin Art Panels – Build depth by pouring multiple layers with different elements.
The Bottom Line
And there you have it, your first step into the wonderfully sticky world of resin crafts! It may feel a little overwhelming at first, but every pour gets better and every mistake teaches you something new.
The beauty of resin crafting is that there are no real rules, just creativity, color, and a whole lot of fun. So don’t be afraid to experiment, mix wild colors, and try crazy new ideas.
Your next masterpiece is just a mold away! Now go on, unleash your inner artist and let that resin work its magic. Happy crafting!